ASPHostCentral.com ASP.NET MVC Hosting BLOG

All about ASP.NET MVC 4.0 Hosting, ASP.NET MVC 3.0 Hosting and ASP.NET MVC Hosting articles

MVC 3.0 Hosting :: Embedding Microsoft Chart Controls on your Application

clock June 7, 2011 16:50 by author Administrator

Introduction

The Microsoft Chart controls are a series of classes in the System.Web.UI.DataVisualization.Charting namespace that allow web developers to ability to add charts to their ASP.NET applications. The most pertinent charting-related class is the Chart class, which contains information about the chart's appearance, series, charting areas, and so forth. In most of the demos and code samples we've explored thus far, we've used the Chart class as a Web control, adding the <asp:Chart> declarative markup to our ASP.NET page, setting a few properties and, occasionally, writing a few lines of code. When used as a Web control, the Chart class both creates the chart (as an image) and then renders an <img> element that points to the generated chart image.

Using the Chart Web control is a standard practice in a WebForms application, but it is not suggested when building an ASP.NET MVC application. (While it is possible to add Web controls - including the Chat Web control - to the views of an ASP.NET MVC application, it is generally frowned upon.) So, if we can't use the Chart Web control in an ASP.NET MVC application, how do we display a chart? In addition to being used as a Web control, the Chart class can also be used programmatically. It is quite possible to create a new Chart object, set some properties, plot the data points, and then generate the chart image. In fact, we looked at using this technique in an earlier installment, Programmatically Generating Chart Images, in which we saw (among other things) how to generate chart images programmatically and add them as attachments in an email message.

This article explores how to display charts in an ASP.NET MVC application. Read on to learn more!

An Overview of Displaying Charts in an ASP.NET MVC Application

Using the Chart Web control in an ASP.NET WebForms application typically involves adding the Chart control to a page, setting a few properties and, perhaps, writing a few lines of code. When a visitor arrives at such a page, the Microsoft Chart Controls take the data to be plotted, dynamically generates an image, and then stores this image either in memory. The Chart Web control itself doesn't return the binary contents of the image; rather, it renders an <img> element whose src attribute points to a file named ChartImg.axd, which grabs the just-created image file from memory and returns it. (This is a bit of an oversimplification and does not describe all of the possible ways the Chart Web control can generate and serve the chart image; refer to the Rendering the Chart article for a more in-depth examination on this topic.)

In an ASP.NET MVC application we do not have the Chart Web control or the ChartImg.axd file at our disposal. Instead, we are on the hook for:

    1. Defining a URL that, when visited, plots the chart data, generates chart image, and returns its contents, and
    2. Adding the HTML to our views to display the chart image

Consider an ASP.NET MVC application that displays sales data charts from the Northwind database. One chart of interest is the annual sales chart, which displays the total sales for all products in a specified category for a specified year (such as the total sales for all Beverages products in 1997). Our first step to displaying such a chart would be to define a URL that, when visited, would return the corresponding chart image. You have total flexibility in the URL pattern you choose to render a report. I like to create a controller named Charts with actions for each type of chart I offer, using querystring parameters to indicate the input parameters for the chart (if any). In other words, for the annual sales chart I'd use a URL pattern like Charts/SalesByYear?CategoryName=CategoryName&OrderYear=Year. With such a pattern in place, visiting www.yoursite.com/Charts/SalesByYear?CategoryName=Beverages&OrderYear=1997 would return the contents of an image file that displays the annual sales data for 1997 for those products in the Beverages category. Bear in mind that this URL returns just the image contents and not any other markup. To display the chart in a view you would add an <img> element to the view, like so:

<img ... src="/Charts/SalesByYear?CategoryName=Beverages&OrderYear=1997" />

I've created an ASP.NET MVC 2 application using C#, Visual Studio 2010, and ASP.NET 4, which is available for download at the end of this article. The remainder of this article shows how to display charts in an ASP.NET MVC application by walking through some of the more interesting aspects of this demo application.

Creating the Charts Controller and SalesByYear Action

In ASP.NET MVC, incoming URLs are mapped to actions, which are methods in a controller. Typically, actions return the HTML markup rendered by a view, but actions can actually return any kind of markup, including plain text, JSON, and binary content. In other words, it's quite possible to create an action that returns the binary contents of an image.

To display charts in an ASP.NET MVC application we need to create an action that returns the binary contents of a specific chart image. As I noted earlier in this article, I like to put all of my chart-generating actions in a single controller named Charts. The name of the action determines the URL that will be used to view a chart image. For example, in the demo application I created an action in the Charts controller named SalesByYear. A simplified version of this action is shown below:

public class ChartsController : Controller
{
   public ActionResult SalesByYear(string categoryName, int orderYear = 1995, bool showTitle = true)
   {
      ...
   }
}


Note that this action takes three input parameters: categoryName, orderYear, and showTitle. These input parameters are automatically assigned the values of the querystring parameters with a matching name. If a visitor requests the URL Charts/SalesByYear, without specifying any querystring parameters, the three input parameters will be assigned their default values - null, 1995, and true, respectively. However, if appropriately named querystring fields are present in the request, such as Charts/SalesByYear?CategoryName=Condiments&OrderYear=1996&ShowTitle=false, then the three input fields will be assigned those values - Condiments, 1996, and false, in this example. (The showTitle input parameter is used to indicate whether to display the chart title in the rendered image.)

The job of the SalesByYear action is to:

    1. Generate the annual sales chart for the requested category and year,
    2. Generating the chart image, and
    3. Return the chart image's binary contents

Back in the Programmatically Generating Chart Images article, we looked at how to work with charts in lieu of the Chart Web control by programmatically creating the Chart object, setting its properties, specifying its data points, and generating the chart image. To start, we need to create an instance of the Chart object and set properties like the Width and Height:

public ActionResult SalesByYear(string categoryName, int orderYear = 1995, bool showTitle = true)
{
   // Create the Chart object and set some properties
   var salesChart = new Chart() {
      Width = 600,
      Height = 400
   };
   ...

Next, we need to plot the chart's data points. There are a variety of ways to do this programmatically, as covered in the Plotting Chart Data installment. If you are going to be frequently creating charts through programmatic means, I recommend that you familiarize yourself with K. Scott Allen's ChartBuilder class, which provides a simple API for plotting the points in a Chart object. (Scott introduced his ChartBuilder class in Charting With ASP.NET And LINQ.)

The following four lines of code uses Scott's ChartBuilder class to create a Sales By Category chart. All of the heavy lifting is handled by the SalesByCategoryChartBuilder class, which we examined in a demo in Plotting Chart Data. (The SalesByCategoryChartBuilder class extends Scott's ChartBuilder class.) In a nutshell, the SalesByCategoryChartBuilder class takes two inputs - the category name and order year - and plots the gross sales for the specified year for all products in the specified category.

  
var builder = new SalesByCategoryChartBuilder(salesChart);
   builder.CategoryName = categoryName;
   builder.OrderYear = orderYear;
   builder.BuildChart();


After the BuildChart method has completed, the Chart object contains information about its chart areas, series, and, most importantly, its data points, which are the sales figures for each of the products in the specified category. At this point the title has been added to the chart, so we can hide it, if needed.

   if (!showTitle)
      salesChart.Titles[0].Visible = false;


We are now ready to generate the chart image! The Chart object has a SaveImage method that can save the chart image to a file or a stream. In this case we want to save the image to a stream so that we can send back the binary contents directly to the client without having to first save the image to disk on the web server. To accomplish this, we: create a new MemoryStream object; save the image as a PNG, sending the image contents to the just-created MemoryStream; return to the beginning of the stream; and then return the binary contents of the stream to the client, specifying a content-type of "image/png", which tells the browser that the binary data it is receiving the binary contents of a PNG image.

   // Save the chart to a MemoryStream
   var imgStream = new MemoryStream();
   salesChart.SaveImage(imgStream, ChartImageFormat.Png);
   imgStream.Seek(0, SeekOrigin.Begin);
   // Return the contents of the Stream to the client
   return File(imgStream, "image/png");
}

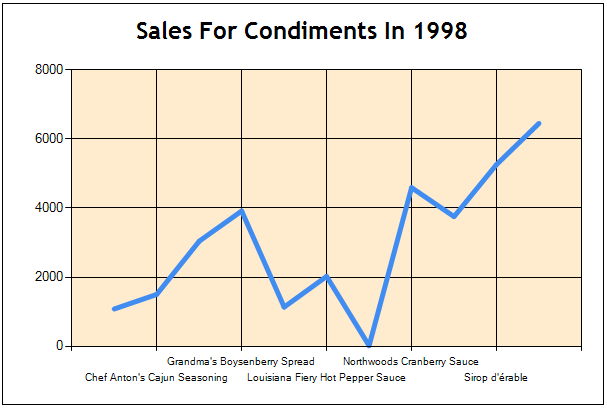
That's all there is to it! With this code in place, visiting www.yoursite.com/Charts/SalesByYear?CategoryName=Condiments&OrderYear=1998 returns the following image:

The sales for Condiments in 1998 chart.


Displaying the Chart in a View

At this point we have a URL that, when visited, generates the chart image and returns it. The next question is, how do we display this chart in a view? Because we have a URL that, when requested, returns an image, we can display this image in a web page by using the <img> element. For example, in the demo application's Home controller's Index view you'll find the following <img> element, which displays the annual sales chart for the Beverages category for 1997:

<div style="text-align: center">
   <img ... src="/Charts/SalesByYear?CategoryName=Beverages&OrderYear=1997" />
</div>


To facilitate displaying charts, I added a number of extension methods to the HtmlHelper class - see the MyHtmlHelpers.cs class in the demo. This adds a Chart extension method to HtmlHelper, allowing you to use syntax in your view like <%: Html.Chart(actionName, controllerName, routeValues) %>. This renders an <img> element with the appropriate src attribute. (For more information on creating your own custom HTML helpers, refer to Creating Custom HTML Helpers.) For example, the following syntax renders the same <img> element from the code snipped above:

<div style="text-align: center">
   <%: Html.Chart("SalesByYear", "Charts", new { CategoryName="Beverages", OrderYear = 1996 }) %>
</div>


What's more, the Chart extension method also can accept a collection of HTML attributes. For example, the following syntax generates an <img> element whose src attribute references the Charts/SalesByYear?CategoryName=Beverages&OrderYear=1996 URL and whose alt attribute is set to "Beverage sales for 1996."

<div style="text-align: center">
   <%: Html.Chart("SalesByYear", "Charts", new { CategoryName="Beverages", OrderYear = 1996 }, new { alt = "Beverage Sales for 1996" }) %>
</div>


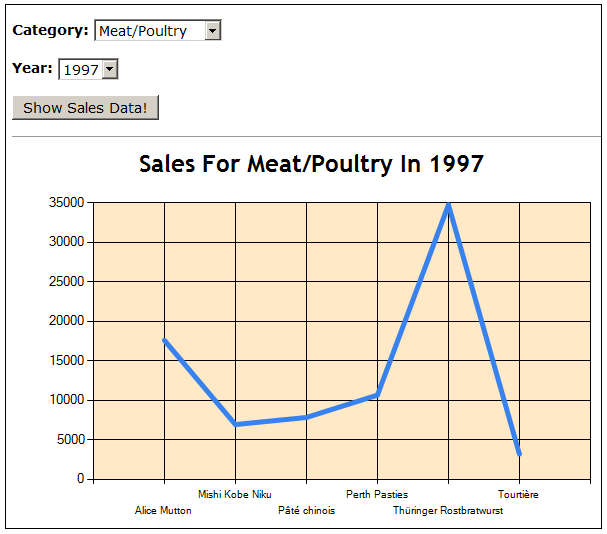
The demo includes two views for displaying the annual sales data. The first one is Home/SalesData, which contains a form with two drop-down lists, one for the set of categories and another for the available years. The screen shot below shows this view in action.

The sales for the Meat/Poultry products in 1997.

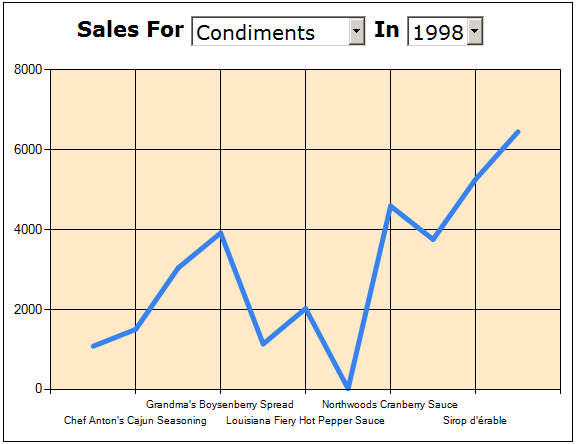
The second view, Home/SalesDataFancy, hides the title in the chart and instead replaces it with text so that the category name and year can be displayed as drop-down lists. In this example, I use JavaScript and jQuery to change the URL of the <img> element whenever the drop-down list selection changes. For example, imagine the user is viewing the sales for the Condiments category for 1998. In that case, the <img> element on the page will have its src attribute referencing Charts/SalesByYear?CategoryName=Condiments&OrderYear=1998. If the user then changes the categories drop-down list to Seafood, rather than doing a postback or requiring the user to click a button, I execute JavaScript code that changes the src of the <img> tag from Charts/SalesByYear?CategoryName=Condiments&OrderYear=1998 to Charts/SalesByYear?CategoryName=Seafood&OrderYear=1998. This has the effect of instantaneously changing the chart and does not require an extra click from the user or the entire page to be reloaded.

The sales for the Condiments products in 1998.

Conclusion

The Microsoft Chart controls include a Chart Web control that simplifies adding charts to an ASP.NET WebForms application. While this Web control can be used in an ASP.NET MVC view, mixing Web controls in MVC views is generally frowned upon. Fortunately, a chart's image can be generated programmatically and its binary contents returned from an action. In this way, it is possible to associate a URL - like Charts/SalesByYear?CategoryName=CategoryName&OrderYear=Year with the image contents of a particular type. Once such a URL has been defined and the action implemented, displaying the chart in a view is as simple as adding an <img> element whose src attribute points to the URL. To simplify this process, I created an extension method for the HtmlHelper class named Chart, which you can find in the demo available for download at the end of this article.

Happy Programming!


Currently rated 1.6 by 39 people

  • Currently 1.589743/5 Stars.
  • 1
  • 2
  • 3
  • 4
  • 5


ASP.NET MVC 3 Hosting :: Working with Razor Syntax RenderSection, RenderBody and RenderPage

clock May 8, 2011 17:23 by author Administrator

Everybody knows Razor is the new view engine ASP.NET Web Pages, so we thought we could write about some Razor syntax you may not be aware of. The three methods we’ll be focusing on today are RenderBody, RenderPage and RenderSection. You’ll need to understand how each of these work if you want to get know the Razor syntax intimately. This code also works in WebMatrix if you're using it.

Before moving on, you need to download ASP.NET MVC 3.
Click here to download and install them using the Microsoft Web Platform Installer.

Open studio 2010 and create a new ASP.NET MVC 3 Web Application (Razor) project. Now it's time to start coding! we’ll begin with the RenderBody method.

RenderBody

The RenderBody method resides in the master page, or in Razor this is commonly referred to as the Layout page. There can only be one RenderBody method per Layout page. If you’re from Web Forms world, the easiest way to think of RenderBody is it’s like the ContentPlaceHolder server control. The RenderBody method indicates where view templates that are based on this master layout file should “fill in” the body content.


RenderPage

Layout pages can also contain content that can be filled by other pages on disk. This is achieved by using the RenderPage method. This method takes either one or two parameters. The first is the physical location of the file, the second is an optional array of objects that can be passed into the page. Add a new cshtml file to the Shared folder and call it _Header.cshtml. We've prefixed this file with an underscore because we don't want this file to be called outside of RenderPage. By default, ASP.NET will not serve pages beginning with an underscore. Here's the code we’re adding to the _Header.cshtml page.

<h1>Header Here</h1>

And to use this in the layout, it's as easy as this.


RenderSection

Layout pages also have the concept of sections. A layout page can only contain one RenderBody method, but can have multiple sections. To create a section you use the RenderSection method. The difference between RenderSection and RenderPage is RenderPage reads the content from a file, whereas RenderSection runs code blocks you define in your content pages. The following code illustrates how to render a footer section.


RenderSection expects one parameter and that is the name of the section. If you don’t provide that, an exception will be thrown. Views can add data to sections by using the following code.


If you ran the website now it’ll run without error. If on the other hand you don’t include the section footer in the view, you’ll get an error.


That’s because by default, sections are mandatory. To make sections optional, just add the second parameter, which is a Boolean value.


Now things will run just fine.

These three methods you will use time and time again when you're using the Razor view engine. This code works both for ASP.NET MVC 3 and also WebMatrix. Have fun!


Be the first to rate this post

  • Currently 0/5 Stars.
  • 1
  • 2
  • 3
  • 4
  • 5


ASP.NET MVC 3 Hosting :: Analyzing AllowHtml Attribute in ASP.NET MVC 3.0

clock March 31, 2011 15:10 by author Administrator

Let's say we are creating a simple form in our ASP.NET MVC 3 web application and there is a Body field on the form where we want to allow HTML Tags.

If we do not disable request validation in some manner for this Body field, we will get the dreaded error - A potentially dangerous Request.Form value was detected from the client (Body = "<br>").


Request validation is a good thing since it keeps people from injecting script tags in our application for Cross-Site Scripting ( XSS ) attacks. However, in this case we want to disable request validation on the Body Field so we can put HTML in the body of our blog posts.

ValidateInput Attribute

In ASP.NET MVC 2 we used the ValidateInput Attribute on the action to disable request validation for the entire request

The downfall of this approach is that the ValidateInputAttribute disables request validation on all model properties, and we just want to disable request validation on a single property, called Body.

AllowHtmlAttribute in ASP.NET MVC 3

In ASP.NET MVC 3 we now have a property attribute that we can include on model properties to disable request validation on a property by property basis, called AllowHtmlAttribute. Instead of using the ValidateInputAttribute on the action, we turn off request validation just on Body by adding the [AllowHtml] Attribute to it:


This allows HTML for the Body Property, but does not allow HTML for the Title Property, which is what we want.

[Note: Briefly in ASP.NET MVC 3, before it was released, there existed a SkipRequestValidationAttribute. It no longer exists and has been renamed to AllowHtmlAttribute.]


Currently rated 1.5 by 4 people

  • Currently 1.5/5 Stars.
  • 1
  • 2
  • 3
  • 4
  • 5


ASP.NET MVC Hosting :: Working with Custom Authorisation in ASP.NET MVC Framework

clock March 30, 2011 16:20 by author Administrator

The whole advantage with MVC over webforms is extensibility at every point. Extensibility, Extensibility, Extensibility.

Authorization is a very important and every web project has there own needs and requirements. Full customisation is paramount.

Here I will show you a simple way to customise your authorization.

In MVC attributes are used to protect a controller method, so we to get started all we need to do is inherit from the AuthorizeAttribute class.

    public class CustomAuthorizeAttribute : AuthorizeAttribute
    {
        protected override bool AuthorizeCore(HttpContextBase httpContext)
        {
            string[] users = Users.Split(',');
            if (!httpContext.User.Identity.IsAuthenticated)
                return false;
            if (users.Length > 0 &&
                !users.Contains(httpContext.User.Identity.Name,
                    StringComparer.OrdinalIgnoreCase))
                return false;
            return true;
        }
    }

This is the basics. We can put any logic we like in here and all we have to do is return false if for whatever reason the user should not be authorized. Then all you need to do is decorate the controller method with the new attribute as below.

    [CustomAuthorize]
    public ActionResult Index()
    {
        return View();
    }

From this simple example we can expand it with custom Roles.

    public class CustomAuthorizeAttribute : AuthorizeAttribute
    {
        // the "new" must be used here because we are hiding
        // the Roles property on the underlying class
        public new SiteRoles Roles;
        protected override bool AuthorizeCore(HttpContextBase httpContext)
        {
            if (httpContext == null)
                throw new ArgumentNullException("httpContext");
            string[] users = Users.Split(',');
            if (!httpContext.User.Identity.IsAuthenticated)
                return false;
            SiteRoles role = (SiteRoles)httpContext.Session["role"];

            if (Roles != 0 && ((Roles & role) != role))
                return false;
            return true;
        }
    }

Where the SiteRoles class is defined as below.

    [Serializable]
    [Flags]
    public enum SiteRoles
    {
        User = 1 << 0,
        Admin = 1 << 1,
        Helpdesk = 1 << 2
    }

This can then be used be used as follows.
    [CustomAuthorize(Roles=SiteRoles.Admin|SiteRoles.HelpDesk)]
    public ActionResult Index()
    {
        return View();
    }

This will only allow the Admin and the Helpdesk Role access to the Index controller. If you don’t belong to one of these roles then you will be sent to the Login page.

The possibilities are really endless.

Happy coding.

Currently rated 2.1 by 12 people

  • Currently 2.083333/5 Stars.
  • 1
  • 2
  • 3
  • 4
  • 5


ASP.NET MVC 3.0 Hosting :: ASP.NET MVC 3.0 Validation and IValidatableObject

clock March 27, 2011 19:04 by author Administrator

I was working with ASP.NET MVC 3 validation today and was tickled to learn of the support for IValidatableObject. I mainly like to use the Enterprise Library Validation Application Block in my projects, but System.ComponentModel.DataAnnotations has come a long way in .NET Framework 4.

[Aside: Note in the following post I interchange “object“, “model“, and “self” validation.] IValidatableObject for Self Validation

For those of you who are familiar with Enterprise Library, you know it has two attributes that can be used for self validation of an object: HasSelfValidation and SelfValidation. The idea here is that there is model validation that may need to happen as a whole in addition to just property validation. Or, maybe validation is so complex that you don't want to use validation attributes and just want to do all validation “manually“ in a method. Self validation in Enterprise Library gives you opportunity to do this.

In the DataAnnotations world, you get this same kind of model or object validation by implementing IValidatableObject. ASP.NET MVC 3 has built-in support for IValidatableObject, so after propery validation it will fire off object validation if your object implements IValidatableObject. An example is shown below:


In this trivial example, I test to see if ConfirmPassword equals Password during registration using IValidatableObject. If they don't match, this is a validation error and I return a ValidationResult with the error. Pretty simple stuff.

IValidatableObject Doesn't Always Fire

There is a gotcha here that may not be obvious. IValidatableObject in ASP.NET MVC 3 will not fire if there are property-level errors. As I mentioned, ASP.NET MVC 3 property validation occurs before object validation. If there are property errors, ASP.NET MVC 3 by design will not fire IValidatableObject so as not to return false positives ( thanks to Brad Wilson of Microsoft for confirming this today ). For those of you who use EnterpriseLibrary and Self Validation where Enterprise Library combines the results, this might not seem obvious and could trip you up. ASP.NET MVC 3 does not combine the results.

In the case above, if the username is not provided ( yet as shown is required ), but both password and confirm password are provided, IValidatableObject will not fire and confirm the passwords match. IValidatableObject will not fire until all property-level validators validate, regardless if the properties play a part in the self-validation or not.

Personally I don't find this an issue, but just wasn't expecting it with all my years of Enterprise Library Validation Application Block experience.

A Note About ValidationAttribute in .NET Framework 4

Just a quick note about ValidationAttribute in System.ComponentModel.DataAnnotations. The ValidationAttribute in .NET 4 has been beefed up with a ValidationContext Class being passed in the validate method. ValidationContext contains the entire object being validated during property validation. You could create a custom validation attribute and place it on Password or ConfirmPassword for property comparison. That is certainly a workaround if you want to return the password comparison error regardless if other non-involved properties do not validate.


Currently rated 3.0 by 4 people

  • Currently 3/5 Stars.
  • 1
  • 2
  • 3
  • 4
  • 5


ASP.NET MVC 3 Hosting :: Working with ASP.NET MVC 3 RedirectPermanent syntax

clock March 23, 2011 16:42 by author Administrator

I am converting an ASP.NET WebForms website to ASP.NET MVC 3 for a client and by choice we are changing the URL structure as well. Because this may be a common situation, Microsoft introduced a new RedirectPermanent method on Response in ASP.NET 4.0.

If you take a peek at ASP.NET MVC 3, you will see new ActionResult Classes that do the same thing. You are probably familiar with Redirect, RedirectToAction, and RedirectToRoute, but now there are versions of these ActionResult Classes for permanent redirects: RedirectPermanent, RedirectToActionPermanent, and RedirectToRoutePermanent:  


Although out of the scope of this post, for search engine optimization benefits you will want to permanently redirect to the new location of a resource that has permanently moved by issuing an HTTP 301. The previous results only issue an HTTP 302, which means the resource has only temporarily moved.
  

Hope this helps.

Currently rated 1.5 by 26 people

  • Currently 1.5/5 Stars.
  • 1
  • 2
  • 3
  • 4
  • 5


ASP.NET MVC 3.0 Hosting :: How to Create and Maintain SessionLess Controllers in ASP.NET MVC 3

clock March 22, 2011 17:43 by author Administrator

One of the new features in ASP.NET MVC 3 is the [SessionState] Attribute that can be decorated on controllers. Using the attribute, you can completely turn on or off session state, adjust it to readonly, or make it required using a SessionStateBehavior Enum with the following choices:

- Default - The default ASP.NET logic is used to determine the session state behavior for the request. The default logic looks for the existence of marker session state interfaces on the IHttpHandler.
- Required - Full read-write session state behavior is enabled for the request. This setting overrides whatever session behavior would have been determined by inspecting the handler for the request.
- ReadOnly - Read-only session state is enabled for the request. This means that session state cannot be updated. This setting overrides whatever session state behavior would have been determined by inspecting the handler for the request.
- Disabled - Session state is not enabled for processing the request. This setting overrides whatever session behavior would have been determined by inspecting the handler for the request.

Turning off session state using the new SessionState Attribute in ASP.NET MVC 3 would look like this:


Obviously if session state is disabled we should no longer try to use the Session Property on the Controller as it will be null. Turning off session state and using the Session Property will give you the dreaded “object reference not set to an instance of object” error:


TempData and Session State

One thing that might not be so obvious is that the default provider for TempData uses session state ( SessionStateTempDataProvider ). Therefore if you turn off session state for the request but then try to access TempData you will get an error. Here is the use of TempData and the default SessionStateTempDataProvider:


and here is “The SessionStateTempDataProvider class requires session state to be enabled” exception you will receive:


If you still want to disable session state but use TempData, create a different provider for it that uses browser cookies for example. As it so happens, you can find a CookieTempDataProvider in ASP.NET MVC 3 Futures

Session State and Child Actions

The TempData scenario may be obvious, but this child action scenario may not be so obvious. Let's say we turned off session state in the parent controller and then we call a child action in a different controller using Html.RenderAction or Html.Action from within the view.


Does the child action have access to TempData and Session? The Child Controller looks like this:


Even though we did not disable session state on this controller, we won't have access to Session State or TempData in the child action because session state was disabled in the parent controller. The same errors mentioned above will occur.

Child Actions vs. Ajax Requests

Don't confuse ajax requests with child actions. I don't suspect you would, but the question has come up before. A child action is kicked off using Html.RenderAction or Html.Action in a view. Ajax requests coming from the browser are not child actions, but completely separate requests into the application. If you use jQuery within a view to grab data from the same action used above, called ChildAction, the action will have full access to session state since the request is no longer a child action but a normal request coming into the application.


I changed the controller to just grab the SessionId which will work fine:


Of course, this is true of any direct request to the action (e.g. http://.../child/childaction ). That request would no longer be a child action, but a regular ol' request. Since it is a regular request through this controller and session state has not been disabled using the [SessionState] Attribute or other means, session state is enabled and fully accessible.

Why Bother With SessionLess Controllers

The big question becomes why bother with SessionLess Controllers in ASP.NET MVC 3 if we have to tip-toe around TempData, ChildActions, etc?

Well, the use of session state has mainly been an issue of scalability, but things are changing a bit with heavy use of Ajax in the browser. One big drawback of using Session State is that concurrent requests to session state within the same session must be done one at a time when done with full read-write access. You cannot access session state in parallel with full read-write privileges as data corruption can occur. Therefore if you have multiple, concurrent requests from the same session they will need to be performed one at a time rather than in parallel.

When does this become a big deal? Mainly when concurrent ajax requests from the browser are firing off in the background in the same user session. If session state is enabled with full read-write privileges, those scripts cannot be run in parallel as they could corrupt session state. They will be executed one-at-a-time and possibly deteriorate the responsiveness of the UI.

A way to get multiple, concurrent requests in the same session to perform in parallel would be to completely disable session state or make it read only when it is indeed read only.

Conclusion

A new feature in ASP.NET MVC 3 is the ability to specify session state behavior on controllers using the new [SessionState] Attribute. Although there are some challenges, they can easily be managed if you need to squeeze out every ounce of scalability and responsiveness from your application.

Hope this helps.

Currently rated 1.7 by 31 people

  • Currently 1.709676/5 Stars.
  • 1
  • 2
  • 3
  • 4
  • 5


ASP.NET MVC 3 Hosting :: Things to know on MVC3's GlobalFilters and HandleErrorAttribute

clock March 21, 2011 18:20 by author Administrator

In MVC3 a GlobalFilterCollection has been added to the Application_Start. This allows you to register filters that will be applied to all controller actions in a single location. Also, MVC3 web applications now add an instance of HandleErrorAttribute to these GlobalFilters by default. This means that errors in the MVC pipeline will now be automatically handled by these attributes and never fire the HttpApplication's OnError event.

This is nice because it is another step away from the old ASP.NET way of doing things, and a step toward the newer cleaner MVC way of doing things.

Out With the Old

Our old HttpModule wired up to the HttpApplication's OnError event and used that to log unhandled exceptions in web applications. It didn't care if the error happened in or out of the MVC pipeline, either way it was going to bubble up and get caught in the module.

public virtual void Init(HttpApplication context)
{
   InsightManager.Current.Register();
   InsightManager.Current.Configuration.IncludePrivateInformation = true;
   context.Error += OnError;
}

private void OnError(object sender, EventArgs e)
{
   var context = HttpContext.Current;
   if (context == null)
       return;
   Exception exception = context.Server.GetLastError();
   if (exception == null)
       return;

   var abstractContext = new HttpContextWrapper(context);   InsightManager.Current.SubmitUnhandledException(exception, abstractContext);
}

However, now the MVC HandleErrorAttribute may handle exceptions right inside of the MVC pipeline, meaning that they will never reach the HttpApplication and the OnError will never be fired. What to do, what to do...

In With the New

Now we need to work with both the attributes and the HttpApplication, ensuring that we will catch errors from both inside and outside of the MVC pipeline. This means that we need to find and wrap any instances of HandleErrorAttribute in the GlobalFilters, and still register our model to receive notifications from the HttpApplications OnError event.

The first thing we had to do was create a new HandleErrorAttribute. Please note that this example is simplified and only overrides the OnException method. If you want to do this "right", you'll have to override and wrap all of the virtual methods in HandleErrorAttribute.

public class HandleErrorAndReportToInsightAttribute : HandleErrorAttribute
{
   public bool HasWrappedHandler
   {
       get { return WrappedHandler != null; }
   }

   public HandleErrorAttribute WrappedHandler { get; set; }
   public override void OnException(ExceptionContext filterContext)
   {
       if (HasWrappedHandler)
           WrappedHandler.OnException(filterContext);
       else
           base.OnException(filterContext);
       if (filterContext.ExceptionHandled)           InsightManager.Current.SubmitUnhandledException(filterContext.Exception, filterContext.HttpContext);   }
}

Next we needed to update our HttpModule to find, wrap, and replace any instances of HandleErrorAttribute in the GlobalFilters.

public virtual void Init(HttpApplication context)
{
   InsightManager.Current.Register();
   InsightManager.Current.Configuration.IncludePrivateInformation = true;
   context.Error += OnError;
   ReplaceErrorHandler();
}

private void ReplaceErrorHandler()
{
   var filter = GlobalFilters.Filters.FirstOrDefault(f => f.Instance is HandleErrorAttribute);
   var handler = new HandleErrorAndReportToInsightAttribute();
   if (filter != null)
   {
       GlobalFilters.Filters.Remove(filter.Instance);
       handler.WrappedHandler = (HandleErrorAttribute) filter.Instance;
   }
   GlobalFilters.Filters.Add(handler);
}

In Conclusion
Now when we register the InsightModule in our web.config, we will start capturing all unhandled exceptions again.

<configuration>
 <configSections>
   <section name="codesmith.insight" type="CodeSmith.Insight.Client.Configuration.InsightSection, CodeSmith.Insight.Client.Mvc3" />
 </configSections>
 <codesmith.insight apiKey="XXXXXXXX-XXXX-XXXX-XXXX-XXXXXXXXXXXX" serverUrl="http://app.codesmithinsight.com/" />
 <system.web>
   <customErrors mode="On" />
   <httpModules>
     <add name="InsightModule" type="CodeSmith.Insight.Client.Web.InsightModule, CodeSmith.Insight.Client.Mvc3"/>
   </httpModules>
 </system.web>
</configuration>

Currently rated 3.2 by 6 people

  • Currently 3.166667/5 Stars.
  • 1
  • 2
  • 3
  • 4
  • 5


ASP.NET MVC 3 Hosting :: Problem in implementing IControllerActivator in ASP.NET MVC 3

clock March 14, 2011 17:16 by author Administrator

ASP.NET MVC 3 introduces two new interfaces to allow simple integration of IoC containers into the MVC pipeline, allowing many different types to be resolved using your IoC container of choice. These interfaces are IDependencyResolver and IControllerActivator but before you go ahead and implement both, let's take a look at whether they are both actually needed.

First some background

If you wanted to inject dependencies into your controllers in ASP.NET MVC 2, you were required to either implement IControllerFactory or subclass DefaultControllerFactory. Typically, you would pass your IoC container into the constructor of your custom controller factory and use it to resolve the controller in the CreateController method. You may also have added custom code in ReleaseController to clean up dependencies

This worked reasonably well, but in ASP.NET MVC 3 things have changed so we can use DI for a whole host of other objects such as filters and view engines

The new interface that we should implement is IDependencyResolver:


The important thing about your implementation of this interface is that it should return null if it cannot resolve a particular object. Below is a simple implementation using Unity:


When an MVC application starts for the first time, the dependency resolver is called with the following types in the following order:
- IControllerFactory
- IControllerActivator
- HomeController
….

If you do not implement IControllerFactory or IControllerActivator, then the MVC framework will try to get the controller from the DependencyResolver itself. As a side note, there is no need to worry about performance (regarding so many calls to the resolver) because MVC will only try to resolve theIControllerFactory and IControllerActivator once on startup and if no implementations are registered then it will subsequently always query the DependencyResolver first

The MVC framework goes on to try to resolve many other types which you probably have not implemented or registered with your IoC container, but as long as your dependency resolver returns null if the type is not registered, MVC will default back to the built-in implementations

If you did not implement your resolver to return null if a type is not registered then you will probably end up seeing an error similar to:

The current type, System.Web.Mvc.IControllerFactory, is an interface and cannot be constructed

The other important thing to note is that both methods on this interface take in the actual service type. This typically means that when you register your controllers with your IoC container, you should only specify the concrete type, not the IController, interface

i.e. using Unity as an example:


rather than:


Failing to register your controllers conrrectly and you will see

No parameterless constructor defined for this object

So at this stage, we have an implementation of IDependencyResolver and nothing else and yet our controller are all resolving correctly. It makes you wonder about whether IControllerActivator is really needed...

About IControllerActivator

IControllerActivator was introduced with ASP.NET MVC 3 to split the functionality of the MVC 2 controller factory into two distinct classes. As far as we can tell, this was done to adhere to the Single Responsibility Principle (SRP). So now in MVC 3, the DefaultControllerFactory outsources the responsibility of actually instantiating the controller to the controller activator. The single method interface is shown below:


If you implement this interface and register your activator with your IoC container, the MVC framework will pick it up and use it when trying to instantiate controllers, but you have to wonder why you would do this instead of just letting your dependency resolver do it directly. Brad Wilson to the rescue:

"If your container can build arbitrary types, you don't need to write activators. The activator services are there for containers that can't be arbitrary types. MEF can't, but you can add [Export] attributes to your controllers to allow MEF to build them..."

This means that if you are working with any competent IoC container* (Castle Windor, Unity, Ninject, StructureMap, Autofac et al), IControllerActivator is not needed and offers no benefit over allowing your DependencyResolver to instantiate your controllers.

* (With the exception of MEF which isn't an IoC container any way)

So we now know that we are probably not required to implement this interface, but are there any benefits to doing so? Something that we have seen mentioned (we cannot remember where) is that implementing IControllerActivator allows you you can provide a more meaningful error message if resolution fails. It is true that the message you would get otherwise (No parameterless constructor defined for this object) is not 100% clear, but we are not sure that this justifies another class just for this purpose. Surely, once you have seen this message, the next time you encounter, it you will immediately know what the problem is. Even if you do implement IControllerActivator, you will not have access to the (normally) detailed message that you IoC container provides when resolution fails, so you can do little more than say resolution failed - i don't know why.

Conclusion

So, should you implement IControllerActivator? Probably not. If you are using pretty much any well known IoC container, just implement IDependencyResolver and it will do everything for you. There is also no need for a custom implementation of IControllerFactory. If you are worried about the lack of release method on the dependency resolver, don't be. The worst case scenario requires a small change to the way that you are using your IoC container. Next time we will talk about how to make sure your dependency resolver plays nicely with IDisposable


Currently rated 1.9 by 21 people

  • Currently 1.857142/5 Stars.
  • 1
  • 2
  • 3
  • 4
  • 5


ASP.NET MVC 3 Hosting :: Working with ASP.Net MVC 3 Razor View Engine and Syntax Highlighting

clock January 25, 2011 14:38 by author Administrator

Today, we found a good answer on syntax highlighting for Razor. In the Visual Studio Gallery located at http://visualstudiogallery.msdn.microsoft.com/en-us/8dc77b9c-7c83-4392-9c46-fd15f3927a2e, a new Visual Studio extension has been recently added for a “Razor Syntax Highlighter”.


To leverage this new extension, we had to remove the editor mapping for .cshtml files in the Visual Studio Text Editor/File Extensions window and install the highlighter extension. As you see in the figure below, it worked great. This new extension uses the Razor Parser libraries to appropriately highlight the Razor code.


Figure 1 - Syntax Highlighting Visual studio 2010 Add-on

Unfortunately, this feature is offered as a Visual Studio Extension and hence is only available for paid-for Visual Studio 2010 editions.

Looking at the Razor Syntax, one can summarize it as a means to short-hand the <%= %> used in ASPX pages to designate code sections. For Razor, only a simple @ sign is used in-place of that bulky aforementioned code markup . Additionally, the Razor parser introduces helpful intelligence that makes the syntax even more user-friendly. For instance the following is a code block you would see in an ASPX page:

<%=if(true){%>
       <input type="hidden" value="istrue"/>
<%}%>  

The corresponding Razor block for this snippet would be:

@if(true){
       <input type="hidden" value="istrue"/>
}

The Razor syntax has simply “inferred” that the code will have a closing curly bracket without us having to apply any special markup tags to it. This further reduces the markup needed to accomplish the same task.

An important difference between Razor and ASPX View Engines is the absence of master pages for the earlier. Razor simply provides a _ViewStart.cshtml to bootstrap our application layout.

@{
    Layout = "~/Views/Shared/_Layout.cshtml";
}

Latest Razor Beta does however support Partial rendering (RenderPartial) to explicitly render a Partial View as well as calling @RenderBody() which loads the actual view content to be served.

Next, we will be talking about creating an MVC project with dual support for ASPX/Razor View Engines as well as further explore the Razor syntax.

Currently rated 1.5 by 14 people

  • Currently 1.5/5 Stars.
  • 1
  • 2
  • 3
  • 4
  • 5


ASP.NET MVC Hosting

ASPHostCentral is a premier web hosting company where you will find low cost and reliable web hosting. We have supported the latest ASP.NET 4.5 hosting and ASP.NET MVC 4 hosting. We have supported the latest SQL Server 2012 Hosting and Windows Server 2012 Hosting too!


Sign in