With the introduction of ASP.NET MVC, the traditional ‘Control’ model of GUI component development went away. Instead it was replaced with the more Web 2.0 style JavaScript and jQuery plugin extensibility model. Nevertheless, adding incremental features to existing HTML components was always required and towards this end Microsoft introduced the HtmlHelper and helper extensions. Helper extensions are .NET extension methods that return a string. Typically, this string is formatted HTML content.
In our sample today we create an extension that renders a bar chart on HTML5 Canvas. It can be bound to a data source from the server side or be assigned data source from the client side.
Building a Html Helper Extension
Html Helper extensions are easy to build. Just follow the steps below to create our helper skeleton.
Step 1: We start with an MVC project and pick the Blank template.
Note we could pick a class library project template too and add package references as follows (via the Nuget package manager as follows)
a. PM> install-package Microsoft.AspNet.Mvc
b. Add reference to System.Web.dll from the ‘Add References’ dialog for the project
Step 2: Add a static class called ChartExtensions. Extension methods, by design, have to be defined in Static classes.
Step 3: Next add a static method Chart whose first parameters is this HtmlHelper and subsequent parameters are values required for rendering the chart.
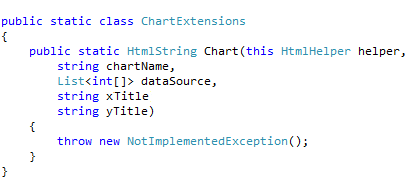
a. The dataSource is a list of integer arrays. For the example we have assumed a two dimensional array would be provided as a data source. We can make it more sophisticated by making it an array of objects and binding to different properties of the object.
b. xTitle: The text to be displayed on the x-axis.
c. yTitle: The text to be displayed on the y-axis.
Step 4: Next we setup two methods, one to convert the dataSource to JSON and the other to generate the required HTML.
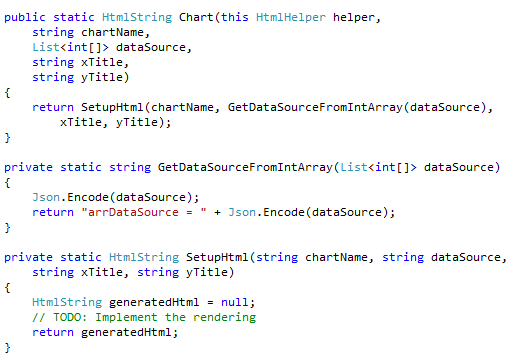
a. The GetDataSourceFromIntArray method uses the System.Web.Helpers’ Json static class to convert the input data source into a Json String. This string is assigned to a variable called arrDataSource and the whole string is returned.
b. The SetupHtml method implements the rendering logic
Step 5: Using TagBuilder to build the Html: ASP.NET provides us with the TagBuilder class that has helper methods to help create HTML elements easily. We use the TagBuilder to create our HTML layout as follows
<div>
<canvas …> … </canvas>
<script …> … </script>
<noscript> … </noscript>
</div>
The actual code is as follows
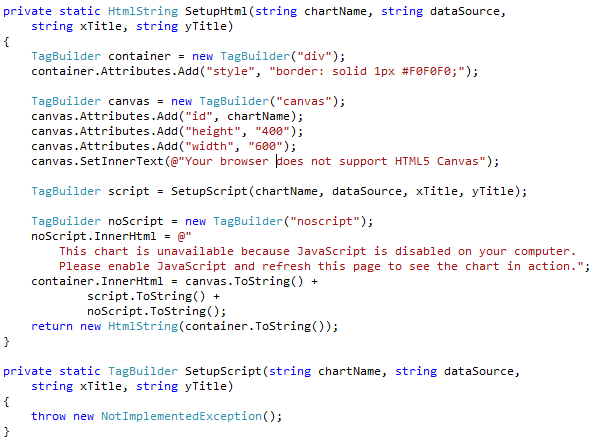
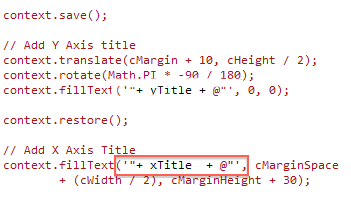
a. As seen above, the TagBuilder object has an Attributes collection to which we can add the HTML attributes we need. To set text between the opening tag and closing tag, we use the SetInnerText. However unlike an XmlTextWriter, we can’t nest tags. To nest tags we simply assign the string representation of the TagBuilder to the InnerHtml of the parent TagBuilder. So the ‘container’ Tag Builder has the <div> that encapsulates the Canvas and the Script tags.
b. We have created a 400x600 canvas area. The chartName parameter is used for the id of the canvas element.
c. For now we have an empty SetupScript method. This method will eventually build the JavaScript required to render the bar graph.
d. The <noscript> tag holds the message to display when JavaScript is not enabled on the browser.
e. Point to note is the HtmlString object that is returned. The HtmlString is a special object that indicates to the Razor view engine that it should not Html Encode this string any further. If we use string instead of HtmlString, the Razor engine automatically Html Encodes the string and we see the markup as text instead of rendered Html.
Step 6: The SetupScript method: The setup script method has the JavaScript that actually renders the chart on the canvas. The original code is borrowed (with permission) from this project. A demo for it is available here. We have to make the following changes so that it accepts any data source instead of the fixed data source assigned to it in the demo. We have also updated the code to use the strings passed in for x-axis and y-axis labels. Beyond this the animation and rendering code is pretty much the same.
a. The variable initialization change
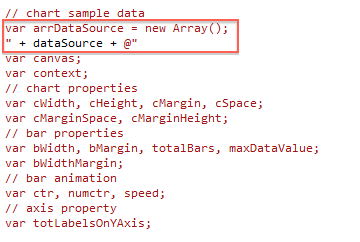
Earlier we had a hard-coded array of strings that was rendered on the canvas. Now we have the Json string that is created from the data source that was passed to the helper.
b. Changes to the barChart() method to set data source on the client side.

In the barChart method we earlier had no parameters and the elementId was hard-coded, now we use the value that’s passed into the helper.
We also pass a data parameter that is assigned to the data source of the graph.
c. Changes in drawMarkers() method to use the values passed into the helper for the x-axis and y-axis label
d. Changes to handle two-dimensional array of points instead of one-dimensional array of comma separated strings.
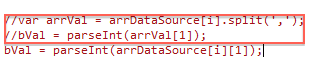
In the original code, the data source is an array of strings. Each element in the array has two comma separated values, represent the year (at index-0) and number of hits (at index-1). We have updated our data source to be a two-dimensional array and hence we don’t need to do a string split to get the value. We directly access the value using appropriate indexes. This change is at three places in the code. One of them is shown above.
With these changes in place our Chart, HtmlHelper is ready to be tested in an ASP.NET Web Application
Integrating the Custom Helper in a MVC Web Application
With our Helper all set, we add an MVC Web Application to our solution and call it DotNetCurry.HtmlHelpers.WebHarness. We use the Internet template that gives us a default Index.cshtml to put our Helper in. The following steps guide us through the integration effort
Step 1: Add Reference to the HtmlHelper project.
Step 2: Add a Model class in the Models folder.
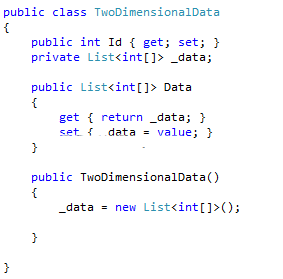
This is our view model that will hold the data to be rendered in the Graph.
Step 3: Update the HomeController to create and pass sample data model.
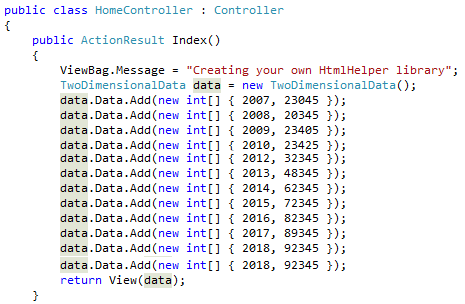
As seen above, we create an instance of our ViewModel class and add some test data into it. We pass this data on to the Index view, where the HtmlHelper will use it.
Step 4: Update the Index.cshtml markup to use the helper
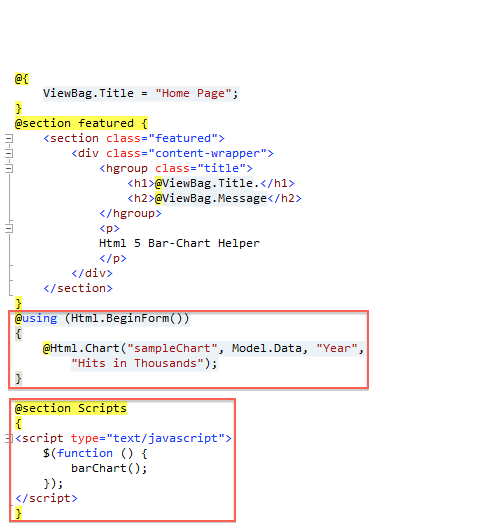
The changes in Index.cshtml highlighted above, from top to bottom are as follows
a. Declare the model to be used in the page.
b. Add using to include the custom HtmlHelper
c. Added the HtmlForm inside which we use our Chart Helper extension. We give it an id=’sampleChart’, pass it the Model.Data and provide the labels for the x and y axes.
d. Finally in the jQuery document ready function, we initialize the chart by calling the barChart() method.
e. Our final effort looks as follows.
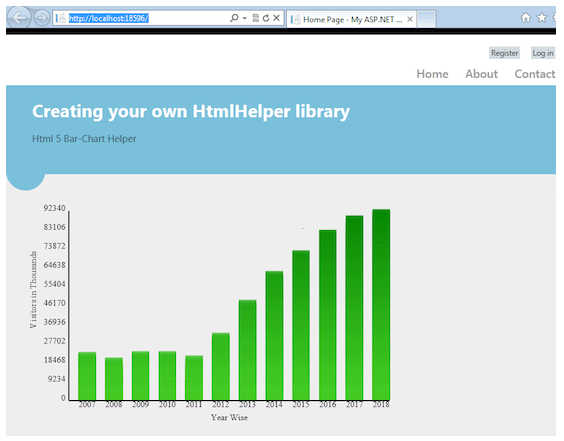
To change the graph change the data set coming from the controller.
That brings us to the end of this tutorial. We round off with some of the improvements possible.
Possible Improvements
1. Update the script to be able to bind to any Json object.
2. Use jQuery plugin syntax so that more than one helper can be created per page.
3. Allow more flexibility like passing parameters for bar colors, size of chart etc.
4. Allow multiple data sources to show comparison side by side.
5. Add more chart types like Pie etc.
Conclusion
Though they sound esoteric HtmlHelper extensions is a rather simple mechanism to inject rich functionality in a componentized way in ASP.NET MVC applications. We converted an existing HTML5 chart, originally created using plain HTML5 and JavaScript into a Chart HtmlHelper with very little code. For large projects, HtmlHelpers are a neat way to encapsulate small pieces of re-usable UI functionality.