ASPHostCentral.com ASP.NET MVC Hosting BLOG

All about ASP.NET MVC 4.0 Hosting, ASP.NET MVC 3.0 Hosting and ASP.NET MVC Hosting articles

Unlimited Domains Windows Hosting with ASPHostCentral.com

clock September 26, 2011 17:52 by author Administrator

A lot web hosting service providers will only allow you to host a single domain name on a single account. This works fine if you plan on having one website only. But later on when you need to setup additional websites, you will need to purchase a separate web hosting account for each of those additional websites. So for example, if you have 10 websites, you will need to pay for 10 web hosting accounts.

What's UNLIMITED Domain Hosting?

Unlimited Domain Hosting allows you to host unlimited number of domain names, or websites, under a single web hosting account. A hosting plan that allows unlimited Domain Hosting will definitely save you money since you can sign up for an account with one company and manage your websites from a central location.

Aside from saving you money, it also allows you to save time. Since all the domains would be hosted on the same hosting account, you can administer each domain simultaneously through the same control panel.

How Do I Take Advantage of Unlimited Domain Hosting?

The best way to get the most out of Unlimited Domain Hosting is to use an "unlimited" web hosting account. With ASPHostCentral.com, you can host any number of domains/websites under one single account and you can start from as low as $4.49/month only!

Currently rated 1.5 by 6 people

  • Currently 1.5/5 Stars.
  • 1
  • 2
  • 3
  • 4
  • 5


ASP.NET MVC 4.0 Hosting :: Sneak Preview of ASP.NET MVC 4 Templates

clock September 26, 2011 17:14 by author Administrator

With release of ASP.NET MVC 4 Developer Preview, ASP.NET MVC team introduces a new default project template for MVC 4. New template has following improvements.

Cosmetic Improvements

New MVC 4 project template has cosmetic improvements prior to MVC 3 project template. And it will help community to create good looking modern websites with the default template itself without investing more in template designing.


Adaptive Rendering

Along with cosmetic improvements, new MVC 4 template used technique called Adaptive Rendering which will help in proper rendering in desktop browser as well mobile browser also without making any changes. To see Adaptive Rendering in action, resize browser window to be smaller and accordingly MVC 4 template layout will be changed to fit with screen size.


Rich UI

Another major improvement with MVC 4 default project template is use of JavaScript and jQuery plugins to provide rich UI. Click on Register and Login link to see rich UI in action.


Currently rated 2.3 by 13 people

  • Currently 2.307692/5 Stars.
  • 1
  • 2
  • 3
  • 4
  • 5


ASP.NET MVC 4 Hosting :: Working with ASP.NET MVC 4 Mobile Project Template

clock September 18, 2011 20:21 by author Administrator

With ASP.NET MVC 4, it’s even easier to setup and carry out a project which target mobile and tablet device. Yes MVC team introduce a new project template with MVC 4 which target mobile and tablet platform. This project template is build on the base of jQuery Mobile. And hence it is also optimized for better experience for touch screen

To get started with Mobile Project Template in MVC 4
Create a new ASP.NET MVC 4 Web Application
Select Mobile Application template when it ask to select project template

As far as the server side code (Controller, Model) is concern, it is same structured as Internet Application template. But responsibility of well rendering and well behavior for touch media is left on jQuery Mobile.

Inspecting Script folder of Internet Application Template and Mobile Project Template, you will find additional jquery.mobile-1.0b2.js file which is core script of jQuery Mobile included in Mobile Project Template of MVC 4.

Another major difference between Internet Application Template and Mobile Project Template is in its view. Inspecting _Layout.cshtml, you will notice some additional script reference and script in Mobile Project which is used by mobile or template device. In addition to script, another major difference in MVC 4 Mobile Project Template View is use of data-role and other attribute which is required for Mobile page structure and it used by mobile device and jQuery Mobile for proper rendering and behavior in touch screen and Smartphone

Currently rated 1.5 by 8 people

  • Currently 1.5/5 Stars.
  • 1
  • 2
  • 3
  • 4
  • 5


ASP.NET MVC 3.0 Hosting :: Getting your ASP.NET MVC Application to return 404 HTTP Status Code

clock August 25, 2011 17:05 by author Administrator

ASP.NET MVC3 includes a new class HttpNotFoundResult in  System.Web.Mvc namespace.

HttpNotFoundResult: Instance of HttpNotFoundResult class indicates to client(browser) that the requested resource was not found. It returns a 404 HTTP status code to the client. Generally we return 404 status code if a requested webpage is not available. In case of MVC applications we return 404 status code is in terms of resources, for example we are searching for particular user profile in the portal, if the user profile is not found, we can return 404.

How to return 404 status code from a MVC application?
First way is to instantiate HttpNotFoundResult class and return the object.

public ActionResult Index()
{
            var result = new HttpNotFoundResult();
            return result;
}


Next alternative is to makes use of HttpNotFound() helper method of the Controller class which returns the HttpNotFoundResult instance.

public ActionResult Index()
{
             return HttpNotFound();
}


we can return 404 along with custom status code description,using the overloded version of HttpNotFound(string statusDescription).

public ActionResult Index()
{
             return HttpNotFound("can not find requested resource");
}

Currently rated 1.5 by 70 people

  • Currently 1.5/5 Stars.
  • 1
  • 2
  • 3
  • 4
  • 5


DotNetNuke 6 Hosting with ASPHostCentral.com

clock August 22, 2011 17:08 by author Administrator

The simplified DotNetNuke 6 user interface dramatically increases productivity by making it much easier to build and maintain Web sites. New pop-up dialogs, a new control panel, updated administration modules and mega-menus combine to deliver a highly modern platform for building and operating websites. The following features are excerpt from http://www.dotnetnuke.com/Resources/Blogs/EntryId/3137/Announcing-DotNetNuke-6.aspx

A New Look
DotNetNuke 6 delivers a fresh new look out of the box with a great looking contemporary skin and a default site template that helps new users get started quickly. Using modern mega-menus and some lightweight containers, DotNetNuke 6 provides the perfect canvas on which to build your next web masterpiece.  

Fully Integrated
For the first time ever, the DotNetNuke Store (Snowcovered.com) and the Extensions Forge, with over 10,000 application extensions, are directly accessible from within the core DotNetNuke platform. The tight integration simplifies the process of finding, purchasing and installing DotNetNuke apps

DotNetNuke in the Cloud
DotNetNuke 6 delivers a platform that is fully compatible with Windows Azure Hosting and provides cloud service integration with the addition of the new Windows Azure Storage and Amazon S3 folder providers. DotNetNuke 6 provides a great foundation for moving to the cloud, whether you need to your whole site to live in the cloud or just your content.

DotNetNuke Commerce
DotNetNuke 6 Professional and Enterprise includes a great new eCommerce module that empowers organizations to quickly add eCommerce capabililities to their website. The new eCommerce module is designed for organizations seeking to deliver a small portfolio of digital goods and services to their end users and is built from the ground up with simplicity and customer experience in mind.

SharePoint Meets DotNetNuke
Available exclusively in the DotNetNuke Enterprise Edition, the Microsoft SharePoint Connector for DotNetNuke enables fast, secure publishing of documents stored in Sharepoint to public web sites, extranets or intranets. Organizations can securely manage their document library within SharePoint and selectively publish those documents using the flexible, cost effective DotNetNuke platform.

DotNetNuke Learns a New Language
DotNetNuke 6 has gotten a major new platform upgrade as the result of a complete conversion to C#. This language change will make it more accessible to a larger development community and allows us to leverage many development tools which have always had strong C# support. The C# version of DotNetNuke has been available for the past year and starting with DotNetNuke 6, it is officially the primary development language of the platform.

Where to go for DotNetNuke 6 Hosting?
ASPHostCentral.com offers the latest
DotNetNuke 6 application to all our new and existing customers. This application is readily available via our control panel and you can install it within 1 (ONE) minute. It just requires several click on your mouse and moreover, it is provided FREE of charge!

You can always start with our
Standard Plan (from @$4.49/month) to get this application installed on your website. Should your requirement changes in the future, you can always request for an upgrade without causing any downtime. Remember, everything is just one-click away from your mouse! So, why wait longer? Please register your interest here.

Currently rated 1.6 by 5 people

  • Currently 1.6/5 Stars.
  • 1
  • 2
  • 3
  • 4
  • 5


ASP.NET MVC 3 Hosting :: Working with ASP.NET MVC 3 WebGrid (get selected row)

clock July 25, 2011 18:51 by author Administrator

Every website has to display data and every website has a Grid control. In ASP.NET MVC 3 there’s the WebGrid, which is part of the Microsoft Web Helpers library. This can be downloaded through NuGet (formerly NuPack). NuGet is a free open source package manager that makes it easy for you to find, install, and use .NET libraries in your projects. One piece of functionality that is critical is reacting when the user selects an item in the WebGrid. This article will focus on finding out which row was selected, but also how to find out more about the data that is selected.

Before moving on, you need to download ASP.NET MVC 3. Click here to download and install them using the Microsoft Web Platform Installer.

Open studio 2010 and create a new ASP.NET MVC 3 Web Application (Razor) project. To focus on the answer, I’ve got a simple model as seen below.


Using the WebGrid, it’s easy to display this data to the user.


The first column is the key to making this work. @item.GetSelectLink outputs a HTML anchor tag with the row selected. This is passed as a QueryString, and the name of the QueryString is set by the selectionFieldName property set on the grid.


To find out what row is selected is just as easy. The WebGrid has a property called SelectedRow. This sets a reference to a GridViewRow object that represents the selected row in the control. When you combine this with the HasSelection property, you can get the selected row like this.


I’ve created a partial view called _Person.cshtml. The file begins with an underscore (_) because I don’t want this file called directly from the web. The second parameter is the data being passed into the partial view. The data in this instance is the selected row.


The partial view has then got access to all the data in the selected row. Nice and easy. Thanks Microsoft!

Currently rated 1.4 by 7 people

  • Currently 1.428571/5 Stars.
  • 1
  • 2
  • 3
  • 4
  • 5


MVC 3.0 Hosting :: Embedding Microsoft Chart Controls on your Application

clock June 7, 2011 16:50 by author Administrator

Introduction

The Microsoft Chart controls are a series of classes in the System.Web.UI.DataVisualization.Charting namespace that allow web developers to ability to add charts to their ASP.NET applications. The most pertinent charting-related class is the Chart class, which contains information about the chart's appearance, series, charting areas, and so forth. In most of the demos and code samples we've explored thus far, we've used the Chart class as a Web control, adding the <asp:Chart> declarative markup to our ASP.NET page, setting a few properties and, occasionally, writing a few lines of code. When used as a Web control, the Chart class both creates the chart (as an image) and then renders an <img> element that points to the generated chart image.

Using the Chart Web control is a standard practice in a WebForms application, but it is not suggested when building an ASP.NET MVC application. (While it is possible to add Web controls - including the Chat Web control - to the views of an ASP.NET MVC application, it is generally frowned upon.) So, if we can't use the Chart Web control in an ASP.NET MVC application, how do we display a chart? In addition to being used as a Web control, the Chart class can also be used programmatically. It is quite possible to create a new Chart object, set some properties, plot the data points, and then generate the chart image. In fact, we looked at using this technique in an earlier installment, Programmatically Generating Chart Images, in which we saw (among other things) how to generate chart images programmatically and add them as attachments in an email message.

This article explores how to display charts in an ASP.NET MVC application. Read on to learn more!

An Overview of Displaying Charts in an ASP.NET MVC Application

Using the Chart Web control in an ASP.NET WebForms application typically involves adding the Chart control to a page, setting a few properties and, perhaps, writing a few lines of code. When a visitor arrives at such a page, the Microsoft Chart Controls take the data to be plotted, dynamically generates an image, and then stores this image either in memory. The Chart Web control itself doesn't return the binary contents of the image; rather, it renders an <img> element whose src attribute points to a file named ChartImg.axd, which grabs the just-created image file from memory and returns it. (This is a bit of an oversimplification and does not describe all of the possible ways the Chart Web control can generate and serve the chart image; refer to the Rendering the Chart article for a more in-depth examination on this topic.)

In an ASP.NET MVC application we do not have the Chart Web control or the ChartImg.axd file at our disposal. Instead, we are on the hook for:

    1. Defining a URL that, when visited, plots the chart data, generates chart image, and returns its contents, and
    2. Adding the HTML to our views to display the chart image

Consider an ASP.NET MVC application that displays sales data charts from the Northwind database. One chart of interest is the annual sales chart, which displays the total sales for all products in a specified category for a specified year (such as the total sales for all Beverages products in 1997). Our first step to displaying such a chart would be to define a URL that, when visited, would return the corresponding chart image. You have total flexibility in the URL pattern you choose to render a report. I like to create a controller named Charts with actions for each type of chart I offer, using querystring parameters to indicate the input parameters for the chart (if any). In other words, for the annual sales chart I'd use a URL pattern like Charts/SalesByYear?CategoryName=CategoryName&OrderYear=Year. With such a pattern in place, visiting www.yoursite.com/Charts/SalesByYear?CategoryName=Beverages&OrderYear=1997 would return the contents of an image file that displays the annual sales data for 1997 for those products in the Beverages category. Bear in mind that this URL returns just the image contents and not any other markup. To display the chart in a view you would add an <img> element to the view, like so:

<img ... src="/Charts/SalesByYear?CategoryName=Beverages&OrderYear=1997" />

I've created an ASP.NET MVC 2 application using C#, Visual Studio 2010, and ASP.NET 4, which is available for download at the end of this article. The remainder of this article shows how to display charts in an ASP.NET MVC application by walking through some of the more interesting aspects of this demo application.

Creating the Charts Controller and SalesByYear Action

In ASP.NET MVC, incoming URLs are mapped to actions, which are methods in a controller. Typically, actions return the HTML markup rendered by a view, but actions can actually return any kind of markup, including plain text, JSON, and binary content. In other words, it's quite possible to create an action that returns the binary contents of an image.

To display charts in an ASP.NET MVC application we need to create an action that returns the binary contents of a specific chart image. As I noted earlier in this article, I like to put all of my chart-generating actions in a single controller named Charts. The name of the action determines the URL that will be used to view a chart image. For example, in the demo application I created an action in the Charts controller named SalesByYear. A simplified version of this action is shown below:

public class ChartsController : Controller
{
   public ActionResult SalesByYear(string categoryName, int orderYear = 1995, bool showTitle = true)
   {
      ...
   }
}


Note that this action takes three input parameters: categoryName, orderYear, and showTitle. These input parameters are automatically assigned the values of the querystring parameters with a matching name. If a visitor requests the URL Charts/SalesByYear, without specifying any querystring parameters, the three input parameters will be assigned their default values - null, 1995, and true, respectively. However, if appropriately named querystring fields are present in the request, such as Charts/SalesByYear?CategoryName=Condiments&OrderYear=1996&ShowTitle=false, then the three input fields will be assigned those values - Condiments, 1996, and false, in this example. (The showTitle input parameter is used to indicate whether to display the chart title in the rendered image.)

The job of the SalesByYear action is to:

    1. Generate the annual sales chart for the requested category and year,
    2. Generating the chart image, and
    3. Return the chart image's binary contents

Back in the Programmatically Generating Chart Images article, we looked at how to work with charts in lieu of the Chart Web control by programmatically creating the Chart object, setting its properties, specifying its data points, and generating the chart image. To start, we need to create an instance of the Chart object and set properties like the Width and Height:

public ActionResult SalesByYear(string categoryName, int orderYear = 1995, bool showTitle = true)
{
   // Create the Chart object and set some properties
   var salesChart = new Chart() {
      Width = 600,
      Height = 400
   };
   ...

Next, we need to plot the chart's data points. There are a variety of ways to do this programmatically, as covered in the Plotting Chart Data installment. If you are going to be frequently creating charts through programmatic means, I recommend that you familiarize yourself with K. Scott Allen's ChartBuilder class, which provides a simple API for plotting the points in a Chart object. (Scott introduced his ChartBuilder class in Charting With ASP.NET And LINQ.)

The following four lines of code uses Scott's ChartBuilder class to create a Sales By Category chart. All of the heavy lifting is handled by the SalesByCategoryChartBuilder class, which we examined in a demo in Plotting Chart Data. (The SalesByCategoryChartBuilder class extends Scott's ChartBuilder class.) In a nutshell, the SalesByCategoryChartBuilder class takes two inputs - the category name and order year - and plots the gross sales for the specified year for all products in the specified category.

  
var builder = new SalesByCategoryChartBuilder(salesChart);
   builder.CategoryName = categoryName;
   builder.OrderYear = orderYear;
   builder.BuildChart();


After the BuildChart method has completed, the Chart object contains information about its chart areas, series, and, most importantly, its data points, which are the sales figures for each of the products in the specified category. At this point the title has been added to the chart, so we can hide it, if needed.

   if (!showTitle)
      salesChart.Titles[0].Visible = false;


We are now ready to generate the chart image! The Chart object has a SaveImage method that can save the chart image to a file or a stream. In this case we want to save the image to a stream so that we can send back the binary contents directly to the client without having to first save the image to disk on the web server. To accomplish this, we: create a new MemoryStream object; save the image as a PNG, sending the image contents to the just-created MemoryStream; return to the beginning of the stream; and then return the binary contents of the stream to the client, specifying a content-type of "image/png", which tells the browser that the binary data it is receiving the binary contents of a PNG image.

   // Save the chart to a MemoryStream
   var imgStream = new MemoryStream();
   salesChart.SaveImage(imgStream, ChartImageFormat.Png);
   imgStream.Seek(0, SeekOrigin.Begin);
   // Return the contents of the Stream to the client
   return File(imgStream, "image/png");
}

That's all there is to it! With this code in place, visiting www.yoursite.com/Charts/SalesByYear?CategoryName=Condiments&OrderYear=1998 returns the following image:

The sales for Condiments in 1998 chart.


Displaying the Chart in a View

At this point we have a URL that, when visited, generates the chart image and returns it. The next question is, how do we display this chart in a view? Because we have a URL that, when requested, returns an image, we can display this image in a web page by using the <img> element. For example, in the demo application's Home controller's Index view you'll find the following <img> element, which displays the annual sales chart for the Beverages category for 1997:

<div style="text-align: center">
   <img ... src="/Charts/SalesByYear?CategoryName=Beverages&OrderYear=1997" />
</div>


To facilitate displaying charts, I added a number of extension methods to the HtmlHelper class - see the MyHtmlHelpers.cs class in the demo. This adds a Chart extension method to HtmlHelper, allowing you to use syntax in your view like <%: Html.Chart(actionName, controllerName, routeValues) %>. This renders an <img> element with the appropriate src attribute. (For more information on creating your own custom HTML helpers, refer to Creating Custom HTML Helpers.) For example, the following syntax renders the same <img> element from the code snipped above:

<div style="text-align: center">
   <%: Html.Chart("SalesByYear", "Charts", new { CategoryName="Beverages", OrderYear = 1996 }) %>
</div>


What's more, the Chart extension method also can accept a collection of HTML attributes. For example, the following syntax generates an <img> element whose src attribute references the Charts/SalesByYear?CategoryName=Beverages&OrderYear=1996 URL and whose alt attribute is set to "Beverage sales for 1996."

<div style="text-align: center">
   <%: Html.Chart("SalesByYear", "Charts", new { CategoryName="Beverages", OrderYear = 1996 }, new { alt = "Beverage Sales for 1996" }) %>
</div>


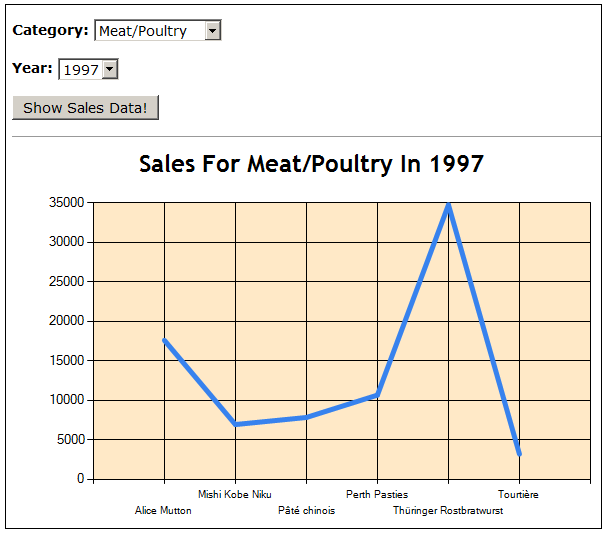
The demo includes two views for displaying the annual sales data. The first one is Home/SalesData, which contains a form with two drop-down lists, one for the set of categories and another for the available years. The screen shot below shows this view in action.

The sales for the Meat/Poultry products in 1997.


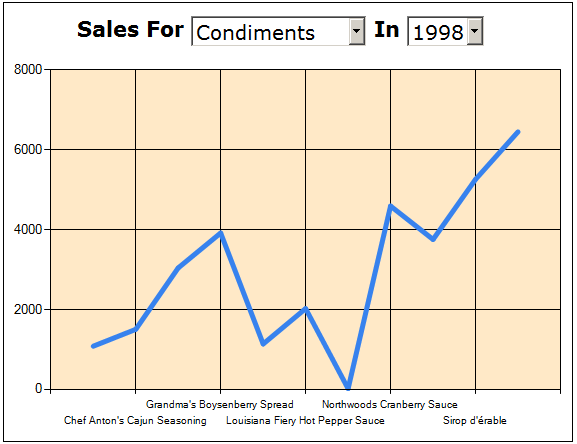
The second view, Home/SalesDataFancy, hides the title in the chart and instead replaces it with text so that the category name and year can be displayed as drop-down lists. In this example, I use JavaScript and jQuery to change the URL of the <img> element whenever the drop-down list selection changes. For example, imagine the user is viewing the sales for the Condiments category for 1998. In that case, the <img> element on the page will have its src attribute referencing Charts/SalesByYear?CategoryName=Condiments&OrderYear=1998. If the user then changes the categories drop-down list to Seafood, rather than doing a postback or requiring the user to click a button, I execute JavaScript code that changes the src of the <img> tag from Charts/SalesByYear?CategoryName=Condiments&OrderYear=1998 to Charts/SalesByYear?CategoryName=Seafood&OrderYear=1998. This has the effect of instantaneously changing the chart and does not require an extra click from the user or the entire page to be reloaded.

The sales for the Condiments products in 1998.


Conclusion

The Microsoft Chart controls include a Chart Web control that simplifies adding charts to an ASP.NET WebForms application. While this Web control can be used in an ASP.NET MVC view, mixing Web controls in MVC views is generally frowned upon. Fortunately, a chart's image can be generated programmatically and its binary contents returned from an action. In this way, it is possible to associate a URL - like Charts/SalesByYear?CategoryName=CategoryName&OrderYear=Year with the image contents of a particular type. Once such a URL has been defined and the action implemented, displaying the chart in a view is as simple as adding an <img> element whose src attribute points to the URL. To simplify this process, I created an extension method for the HtmlHelper class named Chart, which you can find in the demo available for download at the end of this article.

Happy Programming!


Currently rated 1.6 by 39 people

  • Currently 1.589743/5 Stars.
  • 1
  • 2
  • 3
  • 4
  • 5


CSHTML File Hosting with ASPHostCentral.com

clock May 16, 2011 16:38 by author Administrator
ASPHostCentral.com, a premier provider in advanced Windows and ASP.NET hosting service, proudly announces the support of .CSHTML file hosting on our newest Windows Server 2008 Hosting Platform.


You can start hosting your .CSHTML project on our environment from as just low as $4.99/month only. For more details about this product, please visit our product page at
http://www.asphostcentral.com/   

"
One of the benefits is that Razor views can be rendered inside unit tests, this is something that was not easily possible with the previous ASP.Net renderer," said Tom Heinrich, General Manager of ASPHostCentral.


Unit Testable:
 The new view engine implementation will support the ability to unit test views (without requiring a controller or web-server, and can be hosted in any unit test project – no special app-domain required).
," said ASPHostCentral.com Senior Support Specialist, Ryan Dalgish.

For more details, please visit:
http://www.asphostcentral.com/Windows-Shared-Hosting-Plans.aspx


About ASPHostCentral.com:
ASPHostCentral is a premier web hosting company where you will find low cost and
reliable web hosting services. Whether you're an enterprise level business or a small business entity or someone who just wants to host his own personal website - we have a suitable web hosting solution for you.
For more information, visit
http://www.ASPHostCentral.com

Currently rated 1.5 by 40 people

  • Currently 1.5/5 Stars.
  • 1
  • 2
  • 3
  • 4
  • 5


WPF Hosting :: Working with WPF Syntax Highlight

clock May 10, 2011 17:45 by author Administrator

If you are writing code for a while now then by now you must have a lot of code snippets which you will be using in your application development, and you use them because they save a lot of development time. At this moment we have now a huge collection of code snippets which includes functions, classes, extension methods and functions that we have extracted from different open source applications.

As we were progressing towards building an application in WPF which helps us managing all our code, a thought ran into our mind that it would be good if we could use syntax highlighting in the code. As usual we began my search to find a control in WPF which supports syntax highlighting and what we found, We were and we are at present satisfied. The control called AvalonEdit is a part of the free IDE called SharpDevelop for C# and VB.NET and Boo projects.

Languages support by the control:
- ASP/XHTML
- HTML
- JavaScript
- XML
- XMLDoc
- VB.NET
- C#
- C++
- Coco
- Java
- PHP
- Patch
- Boo
- TeX
- Custom Highlighting


After adding the reference in your project, add below XAML code on the window where you have your code window.


At line 4, we will use custom mapping (because it is a third-party control) so we can use the control in our project. At line 7, I have used TextEditor class of the AvalonEdit namespace. The font name and size is the same as of the source code text editor in Visual Studio 2010.

To get the control working with least configuration set some namespaces on the top, and two lines of code on window load for syntax highlighting and to show line numbers respectively.

Namespaces:


Window_Loaded:


If you wish to change the language, then just change the name of the language which is passed as a parameter in the GetDefinition method. The code in the Window_Loaded method will allow you to set syntax highlighting specifically for C#, pretty simple but not very useful. Check out the other way where the text editor will load the file and by reading the file extension, it will set the syntax highlighting. Above method will be useful if the user wants to set syntax highlighting of his choice. But if you want to detect the language and get the syntax highlighting automatically, then use the below code.


 The first line of code will Load the file and the second file will first get the extension of the file loaded, set the instance of the HighlightingManager class and in the end set the syntax highlighting. This is what we got in the end (We are using the second way to load the file). 


Note: To make sure that the second method work, you need to make sure that the file should have a language extension like .cs for C#, cpp for C++, xml for XML files etc. AvalonEdit is an open source code, so you can play around with it and can have your own customizations. There are lots of in-built configurations that you can do to set up your syntax highlighting control. I strongly recommend you to download the below files and take a look at the sample application.
     

Currently rated 1.5 by 12 people

  • Currently 1.5/5 Stars.
  • 1
  • 2
  • 3
  • 4
  • 5


ASP.NET MVC 3 Hosting :: Working with Razor Syntax RenderSection, RenderBody and RenderPage

clock May 8, 2011 17:23 by author Administrator

Everybody knows Razor is the new view engine ASP.NET Web Pages, so we thought we could write about some Razor syntax you may not be aware of. The three methods we’ll be focusing on today are RenderBody, RenderPage and RenderSection. You’ll need to understand how each of these work if you want to get know the Razor syntax intimately. This code also works in WebMatrix if you're using it.

Before moving on, you need to download ASP.NET MVC 3.
Click here to download and install them using the Microsoft Web Platform Installer.

Open studio 2010 and create a new ASP.NET MVC 3 Web Application (Razor) project. Now it's time to start coding! we’ll begin with the RenderBody method.

RenderBody

The RenderBody method resides in the master page, or in Razor this is commonly referred to as the Layout page. There can only be one RenderBody method per Layout page. If you’re from Web Forms world, the easiest way to think of RenderBody is it’s like the ContentPlaceHolder server control. The RenderBody method indicates where view templates that are based on this master layout file should “fill in” the body content.


RenderPage

Layout pages can also contain content that can be filled by other pages on disk. This is achieved by using the RenderPage method. This method takes either one or two parameters. The first is the physical location of the file, the second is an optional array of objects that can be passed into the page. Add a new cshtml file to the Shared folder and call it _Header.cshtml. We've prefixed this file with an underscore because we don't want this file to be called outside of RenderPage. By default, ASP.NET will not serve pages beginning with an underscore. Here's the code we’re adding to the _Header.cshtml page.

<h1>Header Here</h1>

And to use this in the layout, it's as easy as this.


RenderSection

Layout pages also have the concept of sections. A layout page can only contain one RenderBody method, but can have multiple sections. To create a section you use the RenderSection method. The difference between RenderSection and RenderPage is RenderPage reads the content from a file, whereas RenderSection runs code blocks you define in your content pages. The following code illustrates how to render a footer section.


RenderSection expects one parameter and that is the name of the section. If you don’t provide that, an exception will be thrown. Views can add data to sections by using the following code.


If you ran the website now it’ll run without error. If on the other hand you don’t include the section footer in the view, you’ll get an error.


That’s because by default, sections are mandatory. To make sections optional, just add the second parameter, which is a Boolean value.


Now things will run just fine.

These three methods you will use time and time again when you're using the Razor view engine. This code works both for ASP.NET MVC 3 and also WebMatrix. Have fun!


Be the first to rate this post

  • Currently 0/5 Stars.
  • 1
  • 2
  • 3
  • 4
  • 5


ASP.NET MVC Hosting

ASPHostCentral is a premier web hosting company where you will find low cost and reliable web hosting. We have supported the latest ASP.NET 4.5 hosting and ASP.NET MVC 4 hosting. We have supported the latest SQL Server 2012 Hosting and Windows Server 2012 Hosting too!


Sign in